Sunday, February 15, 2015

Nursing Hoodie

I saw a nursing hoodie online that I love but it's over $40. I already have a hoodie pattern, called the compass hoodie, so I decided to try altering the pattern a bit to make it nursing friendly. I wanted something warm so I used micro fleece. A stretchier knit might give better nursing acces but from what I can tell there is enough stretch in the micro fleece. I haven't been able to test it out yet because I'm still pregnant. 

This is not a full pattern or tutorial for making a nursing hoodie. It's only the first couple steps on how to alter an existing pattern. 


You will need a hoodie pattern
Enough fabric for your size according to your pattern
Your fabric needs to have some stretch

*update: I made a second one using 2 fabrics with 4 way stretch. The purple is cotton Lycra. I forget what the floral is but it also has 4 way stretch and is a bit thinner and softer than the purple. It was "flawed" fabric from girl charlee I got for $2 a yard!!! If you order from Girl Charlee too be sure to use coupon code 42716 to save 10%. 

So here are a couple better pictures I took with a quick overview. More detailed instructions follow with my black micro fleece hoodie. 

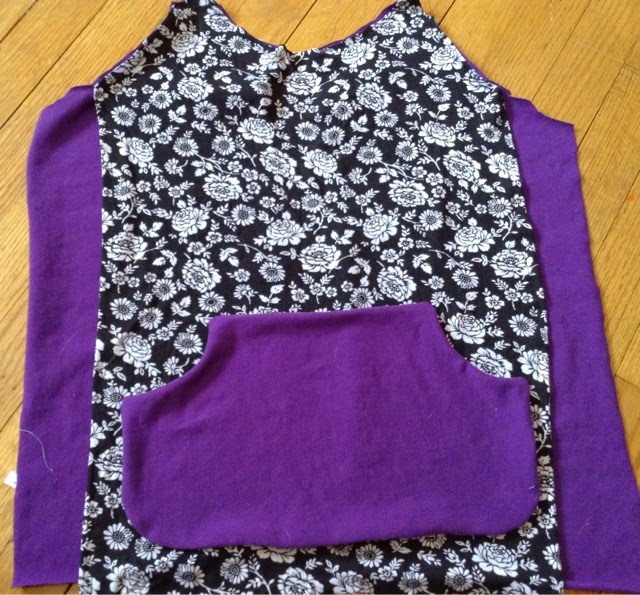
Basically you need a hoodie pattern. All you need to do is cut one extra front piece and cut that piece down the middle. Now take the full front piece and fold over the sides a few inches or measure where the pocket will go and fold over to that point and stretch stitch down both sides. Place the 2 separate front pieces down and carefully line up the full front piece over that. Pin in place and baste stitch over the arms and neckline. Now place your pocket in the spot your pattern shows and sew that on over both layers. Continue with your pattern's directions.

This picture is hard to see. It shows where I placed my pocket. If when you try on your shirt the side flaps don't lay right you can fix in by sewing them down starting from the pocket and stitching straight down to the bottom. 


Here are detailed step by step picture directions showing my micro fleece sweatshirt. 

Cut out your pattern. Instead of one front piece cut two. The second piece you will cut down the middle from top to bottom. With the uncut piece fold over the ends a few inches and pin. Update: the only thing I would change about this step is fold the front piece over enough so that the edge meets up with where the pocket will go. I haven't tried it this way I just think the sweatshirt might function a bit better. 


Now top stich where you pinned using a stretch stitch. 


Next, carefully lay the uncut piece over the cut pieces. Line them up and pin at the shoulders. Optional also pin at the collar. 


Sew or serge as close to the edge as possible at the shoulders and optional at the collar. Make sure both pieces line up as you sew. 

Again, making sure top and bottom pieces are lined up pin the pocket in place. You will be sewing it on both layers of fabric. Follow your pattern's directions for how to sew your pocket. 

This is what the back should look like. It should open at the top and be closed at the bottom. 


To finish your sweatshirt follow your pattern's instructions. This is what mine looks like finished. 


And one to show where the side opens. I placed the scissors where you will pull the two front pieces apart for nursing access.


Sunday, September 23, 2012

Football Dips

Cheesy Black Bean Dip by Aggie's Kitchen
Ingredients
1 15 oz can black beans, rinsed and drained
1 15 oz can diced tomatoes with chiles
1 green bell pepper, chopped
2 teaspoons chili powder
1 teaspoon cumin
salt and pepper to taste
2 cups shredded Mexican cheese or cheese of your choice
Toppings: fresh cilantro sliced black black olives

Instructions 1.Preheat oven to 375 degrees. 2.Combine black beans, tomatoes, peppers, seasonings and 1/2 cup of the shredded cheese in a large bowl. Pour bean mixture into a large (I used 8x8) baking dish. Top with remaining 1 1/2 cups cheese and place in oven. 3.Bake for about 20-25 minutes until dip is bubbly and cheese has melted. Pull dip out of oven and top with fresh cilantro, sliced jalapenos and sliced black olives. Serve with your favorite tortilla chips.

If you need a smaller amount of dip like me use a smaller baking dish and bake only half the amount. I have smaller glass pyrex baking dishes I use to do this. Since you are making a smaller amount of dip it will probably cook faster so bake for 10 minutes and check every 5 minutes after that until done. Then put the remaining half in a small aluminum pan or Ziploc bag to freeze for later use. Do not add toppings to frozen batch.

Cheesy Salsa Dip
For the easy version add equal amounts of salsa and Velveeta cheese to a crock pot. Stir when cheese is melted. Enjoy

For the "healthier" version (This makes 2 cups intended for use in a little dipper crock pot)

Make a cheese sauce. Adapted from Allrecipes Tim's Mac and Cheese
2 tablespoons butter
2 tablespoons all-purpose flour
ground black pepper to taste
1 cup milk
1 1/2 cups shredded Cheddar cheese or cheese of your choice
1 cup salsa

Melt butter in a sauce pan. Add flour and cook 5 minutes or so stirring while it cooks.
Add milk and pepper and cook until sauce thickens. Add cheese and stir until melted.
Pour salsa and cheese into crock pot and keep the heat on low or add salsa to the saucepan until salsa is warm. Enjoy with chips, tortilla chips or veggies

Thursday, September 20, 2012

Vegetarian Goulash

I just made the easiest goulash and it was pretty tasty too. I made a large batch which seems to have about 5 servings. I looked up recipes nonlinear and tweaked a few to make it the way I wanted. You will need 2 cups macaroni or other pasta Olive oil 2-3 bell pepper (I used green) 2-3 garlic cloves minced 2 15oz cans diced tomatoes or about 3-4 diced fresh tomatoes 1can 15oz tomato sauce 2 cups corn 1tbsp paprika 1 tbsp Chili powder Pepper to taste In a medium saucepan cook macaroni using box directions. In a large saucepan add a splash of olive oil. Over medium heat add diced bell pepper and garlic until soft taking care not to burn the garlic. Add remaining ingredients and simmer 20 minutes. Stir in macaroni. Enjoy!

Tuesday, June 26, 2012

Reversible Toddler Hat

OK so technically this hat is a little too big for my son but I made it that way on purpose in hopes that he will be able to wear it next summer too. I found the tutorial here at Sew Much Ado. This hat was so easy and so fun to make and the directions on the site are very easy to follow. I plan on making a second hat with an old pair of jeans and maybe a dinosaur applique.

This hat was made with a pair of my husbands pants that he no longer wanted, an applique I got off a onesie that was handed down to me and some cotton star fabric I already had on hand. I had left over fabric so I made my son a pair of shorts to match.

Monday, June 25, 2012

Anywhere Chair Tutorial

I found a great tutorial for this anywhere chair. Here is an easy to follow video on how to make one Anywhere Chair Video  or visit Made by Marzipan. http://www.madebymarzipan.com/ 


First gather your materials. You will need 3 fabrics, the outer fabric, the inner fabric and thin batting (I used fleece). Cut 1 with all three fabrics:

seat 19X11 inches
strap 36X7 inches
connecting tab 4X5.5 inches
5 inches of velcro


Using the connector tab pieces place right sides together then place the batting on top.


Sew along the long sides of the connector tab. Then turn right side out.


Now take the seat pieces and place right sides together on top of the batting piece.


On the long side of the seat place pins at 4.5 and 7 inches. This will be where the connector tab goes later. Round the edges and sew from one pin to the other leaving the space between the two pins open.


 Turn right side out. Place the connector tab in the opening about 1 inch and sew all the way around the seat.


Now lay the long strap out and measure 4 inches from the end as shown. Mark with pins where the connector tab will go.


Repeat with the strap  the same steps as you did for the seat. Cut off corners to round the edges. Sew from pin to pin leaving the section between the pins open. Turn right side out. Put the connector tab in the open section about 1 inch and sew all the way around.


To finish your project take your 5 inches of velcro and leave the fuzzy side 5 inches and cut the rough side to 3 inches. The velcro will be attached to the strap. Attach the 5 inch fuzzy piece in the center of the strap near the connector tab on the outside fabric of the seat. Sew in place.


The rough side of the velcro goes in the center of the strap on the farthest side from the connector tab on the inside fabric. So my fuzzy velcro went on the polka dot side and my rough velcro went on the jungle side on the opposite end of the strap. Sorry I do not have a picture of this step.


This is what your seat will look like finished. Lay the seat part on the chair with the connector piece toward the back of the chair. Loop the strap around the chair and attach to the velcro piece. Fold the front part of the seat over the strap. The front part of the seat acts as the piece that goes between the child's legs. Make sure you wrap the strap around the back part of the chair to ensure your child stays in place and does not end up on the floor. Never leave your child strapped in the chair without adult supervision.


Sunday, June 24, 2012

Wet Bag

Even if you don't cloth diaper having a wet bag is a must have for mommies. I have mine in my diaper bag and anything dirty or wet goes in to keep everything else in my bag clean and dry. Anything that gets wet, spit up on, drooled on, spilled on goes in the bag. It also comes in handy for the occasional diaper blow out. I have made 3 so far.

I found a great tutorial at A Lemon Squeezy Home. It has easy to follow directions and great step by step pictures. The only thing I have to note is that if you are using a PUL fabric with a print you will want the print to be seen when you open the bag so when you sew on the zipper make sure you have the print side up. In the directions white PUL is used and directions state to have the shiny side up. This is fine for solid PUL fabric.

*JoAnn sells a line of PUL called Babyville for 14.99/print or 12.99/solid a yard. If you have a 50% off coupon you can get a great price. Depending on the size of bag you want you will need about 1/2 yard with plenty left over. Add a zipper and cotton fabric and you can make a bag for less than $10.

Saturday, June 23, 2012

Diaper Changing Pad

I wanted to make a diaper changing pad for the diaper bag because the ones that come with the diaper bag are way too small. I found this tutorial on Pinterest by Always Homemade. The only changes I made were that I made mine larger using half of a standard size towel I bought at Target for $4. I also put the right sides of the fabric together and sewed almost all the way around. Then I turned the diaper pad right side out, folded the fabric over and sewed the pad closed. Since we have 2 diaper bags I made 2 pads. Quilt batting or another type of thicker padding or fabric can be added for a cushier pad.

Thursday, May 24, 2012

Goat Cheese and Basil Grilled Pizza


Yum! This pizza was delicious. To add a smoky flavor I grilled the pizza and added a foil pack of wood chips to the grill. I believe it was hickory wood.

1 pizza dough (I buy mine from Trader Joes)
1 jar of marinara sauce (or use homemade)
goat cheese (mine had kalamata olives)
fresh basil
white cheese such as mozzarella (i used monterey jack cheese because it was what I had on hand)

Start the grill and add the wood chips and preheat the oven according to package directions on the pizza dough.
Roll out the dough and bake for a few minutes in the oven so the pizza can be easily trasfered to the grill. Add enough sauce, cheese and basil for your taste. Grill until bottom of the pizza is slightly charred but not burned and cheese is melted.

Sunday, April 15, 2012

Baby Food


I have been making homemade food for my baby for about a month. I started by making one or two things once a week and freezing them so I would have a good stash when it was time to start solids. Now that he is 5 months old I have started him on some solids and he has taken to it very well. He often cries when he has finished eating because he wants more since he loves it so much. He has had carrots, peas, bananas and avocado.

Cooking Directions
How to make baby food:
carrots, peeled and chopped
zucchini, chopped
peas (fresh or frozen)
apples, chopped
sweet potato, peeled and chopped
winter squash, cut and quartered
pumpkin, cut and quartered
pear, chopped

All of these are great foods to start with and can be prepared the same way.
Prepare your vegetables as stated above. For example I chopped zucchini into 1 inch pieces and cut apples into quarters.

Steam for about 10 minutes.


Blend in a blender or food processor.


Pour into Ice Cube trays to freeze. Once frozen transfer into freezer bags. Use within 3 months. Thaw in fridge or on defrost setting in the microwave.


Directions for no cook fruits and vegetables.
Cantaloupe, Cut in chunks
avocado, Cut through avocado to the pit and slice in half. Remove the pit and scoop out the rest of the fruit.
banana, peel and slice

Prepare as above. For banana and avocado simply mash. For cantaloupe blend in a blender. Scoop into ice cube trays and freeze. Once frozen remove cubes and keep them frozen in a freezer bag. Thaw in fridge or on defrost setting in the microwave.


Brown Rice or Barley Cereal
Put 1/4 cup brown rice or barley in a blender. Pulverize into powder like consistency. Bring 1 cup water to a boil. Add brown rice or barley and simmer until water is absorbed.