Tuesday, June 26, 2012

Reversible Toddler Hat

OK so technically this hat is a little too big for my son but I made it that way on purpose in hopes that he will be able to wear it next summer too. I found the tutorial here at Sew Much Ado. This hat was so easy and so fun to make and the directions on the site are very easy to follow. I plan on making a second hat with an old pair of jeans and maybe a dinosaur applique.

This hat was made with a pair of my husbands pants that he no longer wanted, an applique I got off a onesie that was handed down to me and some cotton star fabric I already had on hand. I had left over fabric so I made my son a pair of shorts to match.

Monday, June 25, 2012

Anywhere Chair Tutorial

I found a great tutorial for this anywhere chair. Here is an easy to follow video on how to make one Anywhere Chair Video  or visit Made by Marzipan. http://www.madebymarzipan.com/ 


First gather your materials. You will need 3 fabrics, the outer fabric, the inner fabric and thin batting (I used fleece). Cut 1 with all three fabrics:

seat 19X11 inches
strap 36X7 inches
connecting tab 4X5.5 inches
5 inches of velcro


Using the connector tab pieces place right sides together then place the batting on top.


Sew along the long sides of the connector tab. Then turn right side out.


Now take the seat pieces and place right sides together on top of the batting piece.


On the long side of the seat place pins at 4.5 and 7 inches. This will be where the connector tab goes later. Round the edges and sew from one pin to the other leaving the space between the two pins open.


 Turn right side out. Place the connector tab in the opening about 1 inch and sew all the way around the seat.


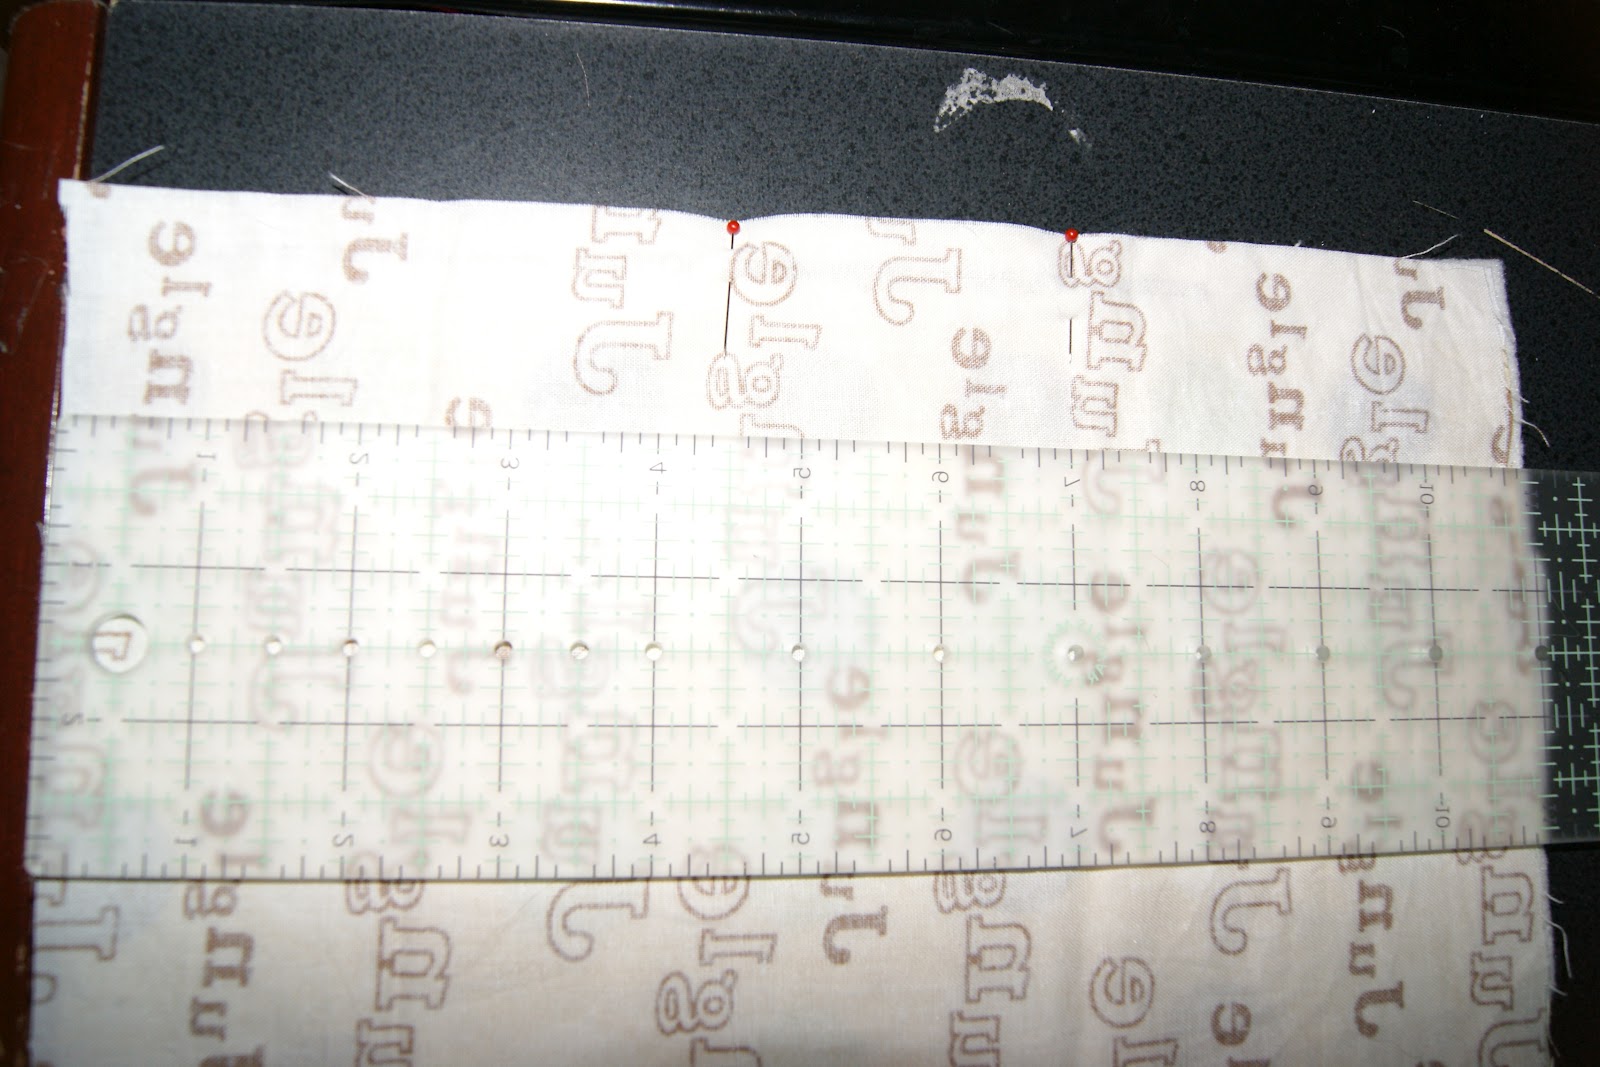
Now lay the long strap out and measure 4 inches from the end as shown. Mark with pins where the connector tab will go.


Repeat with the strap  the same steps as you did for the seat. Cut off corners to round the edges. Sew from pin to pin leaving the section between the pins open. Turn right side out. Put the connector tab in the open section about 1 inch and sew all the way around.


To finish your project take your 5 inches of velcro and leave the fuzzy side 5 inches and cut the rough side to 3 inches. The velcro will be attached to the strap. Attach the 5 inch fuzzy piece in the center of the strap near the connector tab on the outside fabric of the seat. Sew in place.


The rough side of the velcro goes in the center of the strap on the farthest side from the connector tab on the inside fabric. So my fuzzy velcro went on the polka dot side and my rough velcro went on the jungle side on the opposite end of the strap. Sorry I do not have a picture of this step.


This is what your seat will look like finished. Lay the seat part on the chair with the connector piece toward the back of the chair. Loop the strap around the chair and attach to the velcro piece. Fold the front part of the seat over the strap. The front part of the seat acts as the piece that goes between the child's legs. Make sure you wrap the strap around the back part of the chair to ensure your child stays in place and does not end up on the floor. Never leave your child strapped in the chair without adult supervision.


Sunday, June 24, 2012

Wet Bag

Even if you don't cloth diaper having a wet bag is a must have for mommies. I have mine in my diaper bag and anything dirty or wet goes in to keep everything else in my bag clean and dry. Anything that gets wet, spit up on, drooled on, spilled on goes in the bag. It also comes in handy for the occasional diaper blow out. I have made 3 so far.

I found a great tutorial at A Lemon Squeezy Home. It has easy to follow directions and great step by step pictures. The only thing I have to note is that if you are using a PUL fabric with a print you will want the print to be seen when you open the bag so when you sew on the zipper make sure you have the print side up. In the directions white PUL is used and directions state to have the shiny side up. This is fine for solid PUL fabric.

*JoAnn sells a line of PUL called Babyville for 14.99/print or 12.99/solid a yard. If you have a 50% off coupon you can get a great price. Depending on the size of bag you want you will need about 1/2 yard with plenty left over. Add a zipper and cotton fabric and you can make a bag for less than $10.

Saturday, June 23, 2012

Diaper Changing Pad

I wanted to make a diaper changing pad for the diaper bag because the ones that come with the diaper bag are way too small. I found this tutorial on Pinterest by Always Homemade. The only changes I made were that I made mine larger using half of a standard size towel I bought at Target for $4. I also put the right sides of the fabric together and sewed almost all the way around. Then I turned the diaper pad right side out, folded the fabric over and sewed the pad closed. Since we have 2 diaper bags I made 2 pads. Quilt batting or another type of thicker padding or fabric can be added for a cushier pad.