Sunday, August 28, 2011

Ribbon Blanket

I made this blanket using left over materials after making my simple baby quilt. I was inspired to create this project after finding Taggie brand blankets for babies. I have also made a ribbon cube too.

You can make this blanket using one piece of fabric if desired but since I was using leftover scraps from another project I pieced different types of fabric together. I used fleece for this project but flannel or other soft fabric would work just as well.

You will need:

 solid fleece fabric 2 pieces cut into 15"X16X, and 2 7"X7" pieces
 pattern fleece cut into 4 15"X71/2" pieces.
Ribbon, rick rack, and/or fabric scraps about size 7" X 2 1/2" (bigger or smaller if desired)
You may make your blanket bigger or smaller if desired. My finished blanket is 20"X20"


1. If you are using small scraps to make ribbons follow this step. If you are not skip to step 2.
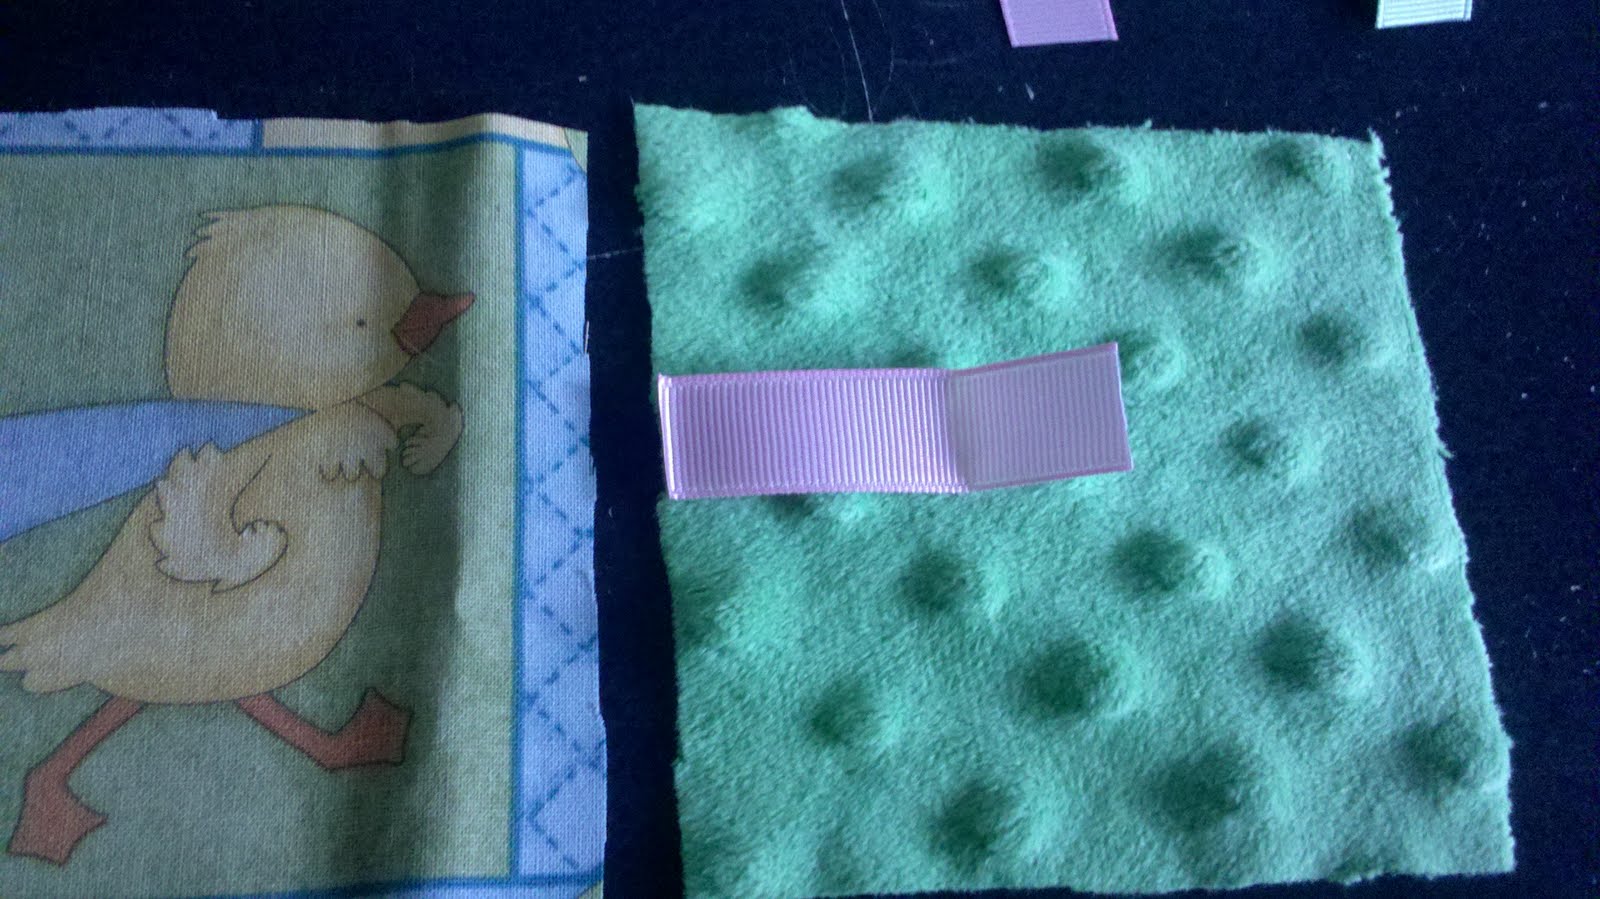
To make ribbons fold one piece of rectangular fabric scrap in half lengthwise and sew. Mine were cut into 7"X2 1/2" strips. Wider strips are easier to work with. Turn the fabric scrap inside out. Make as many as you like. I used about 8 for my blanket as well as ribbons I had on hand.


2. Place right sides together of one pattern piece and small solid square. You may place a ribbon here if you like. Sew together and trim excess fabric. Repeat with one more pattern piece and the remaining small solid square piece.


3. Now place right side of one larger solid square piece and one pattern piece together. You made add ribbons here too. Sew Repeat with remaining fabric pieces.

4. You should now have 2 larger fabric pieces and 2 smaller rectangular pieces.
Piece together one of each with right sides together adding ribbons where you like them as shown below.
Sew. Trim excess fabric.

Repeat a second time with the remaining two pieces of fabric.


You should now have two fabric pieces that look like this.

5. Place the two pieces with right sides together and trim any excess fabric.
Pin the two sides in place adding more ribbons where desired.
Sew almost all the way around leaving enough of the blanket unsewn so you can turn it inside out. Trim excess fabric. 

6. Turn the blanket inside out and sew closed.
To see more examples of ribbon blankets check out the Taggie website. I have also seen this blanket sold on Etsy too.


Saturday, August 27, 2011

Recipe Binder

I subscribe to several cooking magazines like to keep the recipes I want to make but don't want a stack of magazines lying around the house. My grandma bought me a recipe binder and I have found it to be a great way to keep and organize recipes I get from magazines and print off the Internet.


What you will need is a binder and plastic page protectors. Your binder can be a fancy as you like. I choose to buy the 1-2 inch binders so I can fit quite a few recipes without there being too many. I also buy the plain color plastic binders but I have seen some very cute binders too. You may also choose to decorate your binder yourself or buy a recipe binder kit like the one my grandma gave me.

You may also choose to include tabs to divide different sections of your binder. These tabs usually come with binder kits intended for recipes although I have found if you use page protectors the tabs are not wider than the recipes so they tend to be hard to find.

All you need to do is collect recipes and tear out pages from magazines with recipes you want to make. Place recipes back to back before putting them in the page protectors. Not only is it easier to slide the pages in this way but you will also have two recipes for every one page protector. If there are recipes on both sides of the page you only insert the one page. Then put the page protectors in the binder.


Your binder can be organized by breakfast, appetizer, main dish and desert or you can organize by type of ingredients or category.

Now that stack of loose recipes and magazines are organized into one neat binder.

I have already filled two binders and about to start on my third. I'd love to make each binder a different category and have breakfast in one, appetizers, soups, salads and deserts in a second and put all of the main dish recipes in the third binder. Maybe that will be a project for next summer. 

A to Z.. a lot about me


I saw this on C.R.A.F.T. and thought it was a great idea. I’ve been super busy starting up another school year that I haven’t been able to create anything new so I thought this would be a quick fun thing to do to add to my blog.


A. age: 29.

B. bed size: king.

C. chore you hate: mopping the floor.

D. dogs: Two, Gracie and Addy my border collies.

E. essential start to your day: breakfast, I need it to get me through the morning of working my students.

F. favorite color: purple

G. gold or silver: silver

H. height: 5'0"

I. instruments you play: used to play guitar but haven’t in several years

J. job title: My full title is a primary reading interventionist and Reading Recovery teacher. What that means is I help students in kindergarten-second grade by providing reading interventions.

K. kids: 1 of my own on the way but I have had close to 200 if you count all of my students over the years.

L. live: in the Chicago area

M. maiden name: got rid of that last summer

N. nicknames: I’m called Chris, Chrissy and sometimes teacher

O. overnight hospital stays: one surgery and soon to be another hospital stay when my son arrives.

P. pet peeve: lots

Q. quote: One recent quote I read is If you have a library and a garden you have everything.

R. righty or lefty: righty

S. siblings: a half brother, half sister and little sister

T. time you wake up: 5:45 unless I hit snooze a few times. 

U. university attended: lots, College of DuPage, Eastern Illinois University, Concordia, Northern Illinois University, Dominican University and currently National Louis University

V. vegetables you dislike: carrots 

W. what makes you run late: traffic

X. x-rays you’ve had: recently? Nope

Y. yummy food: pizza, ice cream, raspberries and strawberries

Z. zoo animal favorite: I’ve been to the zoo so many times on my own and for field trips that I have begun to enjoy the excitement and reactions of the kids I am with more than seeing the animals myself.


Thanks for Reading!

Thursday, August 18, 2011

Sewing Patterns

I love to create my own projects but sometimes it is fun to sew with a pattern too. I have created several things for my nursery using patterns. To get a good deal I wait until JoAnn Fabrics has a sale where patterns cost 1.99 and sometimes .99. During these sales I stock up on projects I might want to make in the future. Here are some pattern projects I've made.
Here is a link for free pattern downloads from McCall's and  Butterick

Simplicity 2613

McCall's 4855

Simplicity 2389

Wednesday, August 17, 2011

Turn an Old T-shirt into a Bag

I had a t-shirt a friend gave me from Japan. It no longer fits but I didn't want to get rid of it so I decided to turn it into a bag. Here is what I did.


First, cut the arms and collar off the shirt making a rectangle shape.

Next, put the two pieces together so that right sides face in and sew along the sides and bottom.


Use the rectangle to cut two pieces of fabric for the inside lining of the bag. Add a couple extra inches at the top.


Sew the sides and bottom of the lining with right sides together.
Turn the bag inside out but leave the lining the way it was sewn..


Place the lining in the bag and fold over the top in half then over one more time to make a band over the top of the bag. Sew in place.


Cut two strips of fabric for the straps the desired length and width that you want making sure to cut the width double the size you want the strap to be. Fold the strap and sew the bottom and side. Turn inside out and stitch the top closed.
Sew the strap to each side of the bag.
Hand sew buttons, bows, small silk flowers or other embellishment over the stitches of the straps if desired.


Monday, August 15, 2011

Bath Time Mitts

I got one of these bath mitts as a gift to use when giving my son a bath. I thought it was very cute and useful for bath time so I decided to make some myself. They are a very simple project and require very little fabric. I used pieces from my scrap pile to make these two bath mitts.


You will need non stretchy fabric for the front of the mitt and terrycloth for the back of the mitt and elastic (optional).

1. Use the template to cut one piece from terry cloth and one from your non stretchy fabric. You may wish to also cut a strip for embellishment as seen on my green polka dot mitt. You may make the mitt larger or smaller if desired.


2. If you are using a strip of embellishment fabric decide where on the mitt you would like it to go and pin it to the top of the fabric while slightly folding the top and bottom under to prevent fraying. Sew the top and bottom of the embellishment fabric.

3. Place the two fabric pieces (the patterned fabric and terrycloth) with right sides together. Sew around the mitt leaving the top unsewn.

4. Fold the top over about a half inch and sew making sure not to sew the mitt closed. If desired you may add elastic to the top band.

5. Turn inside out and use during bath time.

Sunday, August 14, 2011

Baby Bib and Burp Cloth

For baby bib directions click this link.

For the burp cloth you will need absorbent fabric such as terry cloth for at least one side.
Use the template and cut two on the fold. I used cotton for one side and terry cloth for the back but I have also used flannel as well. For a contoured burp cloth pattern see this link.


The burp cloth is sewn the same as the bib. For step by step pictures see the bib tutorial.

1. Place wrong sides together and sew almost all the way around leaving a few inches unsewn.
2. Trim excess fabric around the seam.
3. Turn inside out and sew along the edge making sure to slightly fold in the unsewn side.
4. If you wish you may add an iron on applique or embroidery.

Baby Bib


1. Use the pattern and cut 2 for the bib or use a bib you already have as a template.


2. Put like sides together and sew almost all the way around leaving a couple inches on one side unsewn.

3. Trim the bib around the seam.


4.Turn the bib inside out and sew along the edge making sure to fold in the unsewn part. If you don't want this stitch to show use a thread color that is the same as the fabric.


5. Attach Velcro and applique if desired. 


Friday, August 12, 2011

DIY Baby Projects


Taggie Cube for Baby

I had heard of Taggies and how popular they are for babies. When I checked out the website I learned that it started out as a small business that sold blankets with tags sewn on the ends for baby's amusement and stimulation. Their products are very cute and several are easily reproducible. I decided to make a cube using the concept by Taggies.


Materials
remnant fabric cut into 6 4"X4" squares
ribbon or rick rack
stuffing
rattle or bell (optional)


1. Decide how you want your cube to look. Choose the first two squares of fabric and one tag. Position the tag on the right side of one square and place the other square on top with right sides together. Sew one side. 
Notice how the tag is slightly hanging out in order to sew in place.


2. Choose the next square and tag to sew. Put the tag in place and the square on top, right sides together.


 3. Repeat with the next square and tag.


4. Fold in half, place the tag in place and sew the end squares with right sides together.


5. Sew tags in place for top and bottom squares.


6. Sew the top onto the cube stitching all 4 sides.


7. Sew the bottom square onto the cube sewing only 3 sides.

8. Turn cube inside out and stuff with stuffing and a rattle or bell if desired. Pin the last side down and sew shut. If this is difficult on your machine you may choose to hand stitch the cube closed.


Here is the finished cube.